Birkmyre secured a dramatic win over local rivals Bishopton at the weekend. Trailing by two points with no time left on the clock, they scored with the final play of the game to take a 36–33 victory.
Birkmyre started the brighter of the two sides and opened the scoring after only five minutes. Scrum-half Jonny Davidson seized the opportunity to go blind near the touchline from a ruck 20m off the Bishopton try line. He chipped through and benefited from a defensive blunder to regain the ball and dive over for the score. The conversion hit the crossbar but failed to go over.
In the 15th minute the home side increased their lead to 12 points through skipper Robbie Espie. From an attacking lineout near the try line, veteran Gordon Stein made vital metres. The ball then went through the backs’ hands to Espie, who broke a tackle and, as he was eventually being brought down, stretched out to touch the ball down.
Bishopton then pulled a score back. Some positive play, combined with poor tackling, saw the deficit reduced to five points four minutes later.
In the 27th minute Birkmyre scored again. Winger Alex MacKay chased a clearance kick from Espie. The Bishopton full-back stumbled as he went to collect, opening the door for MacKay to snatch the ball 25m out and run in unopposed.
Bishopton closed the lead to five points again in the 36th minute. However, Birkmyre went in at half-time 26–12 ahead thanks to a bonus-point score from Jamie Haran. Birkmyre were pressuring the try line following a lineout five metres out. After a few phases, Stein threw a wide pass out left which Haran came crashing onto, and there was no stopping him from six metres out.
Birkmyre were looking for more of the same in the second half, however it was Bishopton who got out of the blocks quicker. Five minutes into the second half they reduced the deficit to seven points, with their powerful forwards proving too much from close range.
Birkmyre responded with their fifth try through Player of the Match Michael McGeoch only two minutes later. Phase-one ball from a scrum 25m out saw the ball moved across the field into his hands. He broke three tackles and weaved his way through the defence to score near the posts.
Bishopton then took the upper hand for a period. They clawed seven points back in the 52nd minute to reduce the Birkmyre lead to a perilous five points, and the game looked as if it could have gone either way.
In the 74th minute the game appeared to swing in favour of the home side. Having won a penalty 30m out, slightly to the left of the posts, they opted for a kick at goal. However, the ball slipped wide and the gap remained at five points. Two minutes later the game seemed to flip in favour of Bishopton when Birkmyre prop Louis Hoodless received a yellow card for collapsing the scrum.
With ball in hand from the previous offence, Bishopton gained the lead for the first time in the match with only two minutes remaining. They took advantage of the extra man and pressure inside the 22 to first equalise with a try. This resulted in what turned out to be a premature mini pitch invasion by their bench, despite the resulting conversion giving them a two-point lead.
From the kick-off, Birkmyre managed to reclaim possession and made progress down the pitch. However, they turned the ball over and Bishopton kicked the ball into touch believing time had run out. The referee had in fact called one minute remaining, giving Birkmyre a further chance.
Winning the lineout 40m out, McGeoch drove forward to the edge of the opposition 22. Birkmyre then went through multiple phases, edging closer to the try line while drawing defenders in. After 11 phases, the backs called for the ball. It found its way to Ali Peacock, who broke a double tackle and dived over for the winning score with the final play.
The conversion was missed, but the try was enough to secure a three-point win.
The victory takes Birkmyre above Bishopton in the league by two points, with a game in hand, with both sides comfortably sitting mid-table in sixth and seventh respectively.
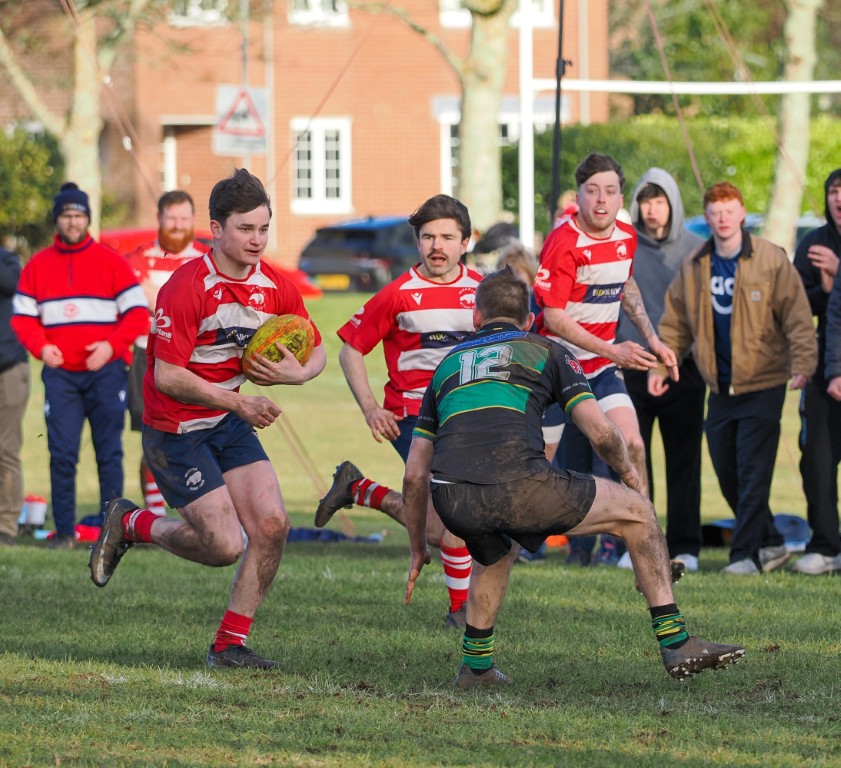


Photo Credit: With thanks to Fiona Wallace